Mostrando entradas con la etiqueta Hazlo tú. Mostrar todas las entradas

sábado, 21 de enero de 2012

Hazlo tú: Prensando pigmentos - DIY: Pressing pigments.

Parece que últimamente me ha dado por hacer bricolaje de potinguera, pero la verdad es que esto que os voy a contar venía pensándolo desde hace tiempo.
La razón es que tenía varios pigmentos a los que no daba mucho uso, y se me ocurrió que para tenerlos más a la vista, ordenados y que ocupen menos sitio (hay que optimizar el espacio) podía prensarlos.

It seems that I'm doing a lot of make-up-DIY lately, but actually I've had what I'm telling you now in mind for quite a long time.
The fact is that I had some pigments which I didn't use much, and I came up with the idea of pressing them to be within sight, properly stored and taking less space (seizing the space).

Había visto varios tutoriales en youtube sobre cómo hacer esto, y hace unos días me animé a ponerlo en práctica. Precisamente en nuestro segundo pedido a Buyincoins, compramos (entre otras cosas) una paleta vacía con 15 godets de 36mm, que tenía pensado utilizar para prensar pigmentos.

After watching some tutorials on youtube about how to do this, I made up my mind to put it into practice a few days ago. In our second order to Buyincoins, we bought (among other things) an empty palette with 15 pans, 36mm wide, which I was thinking of using to hold pressed pigments.


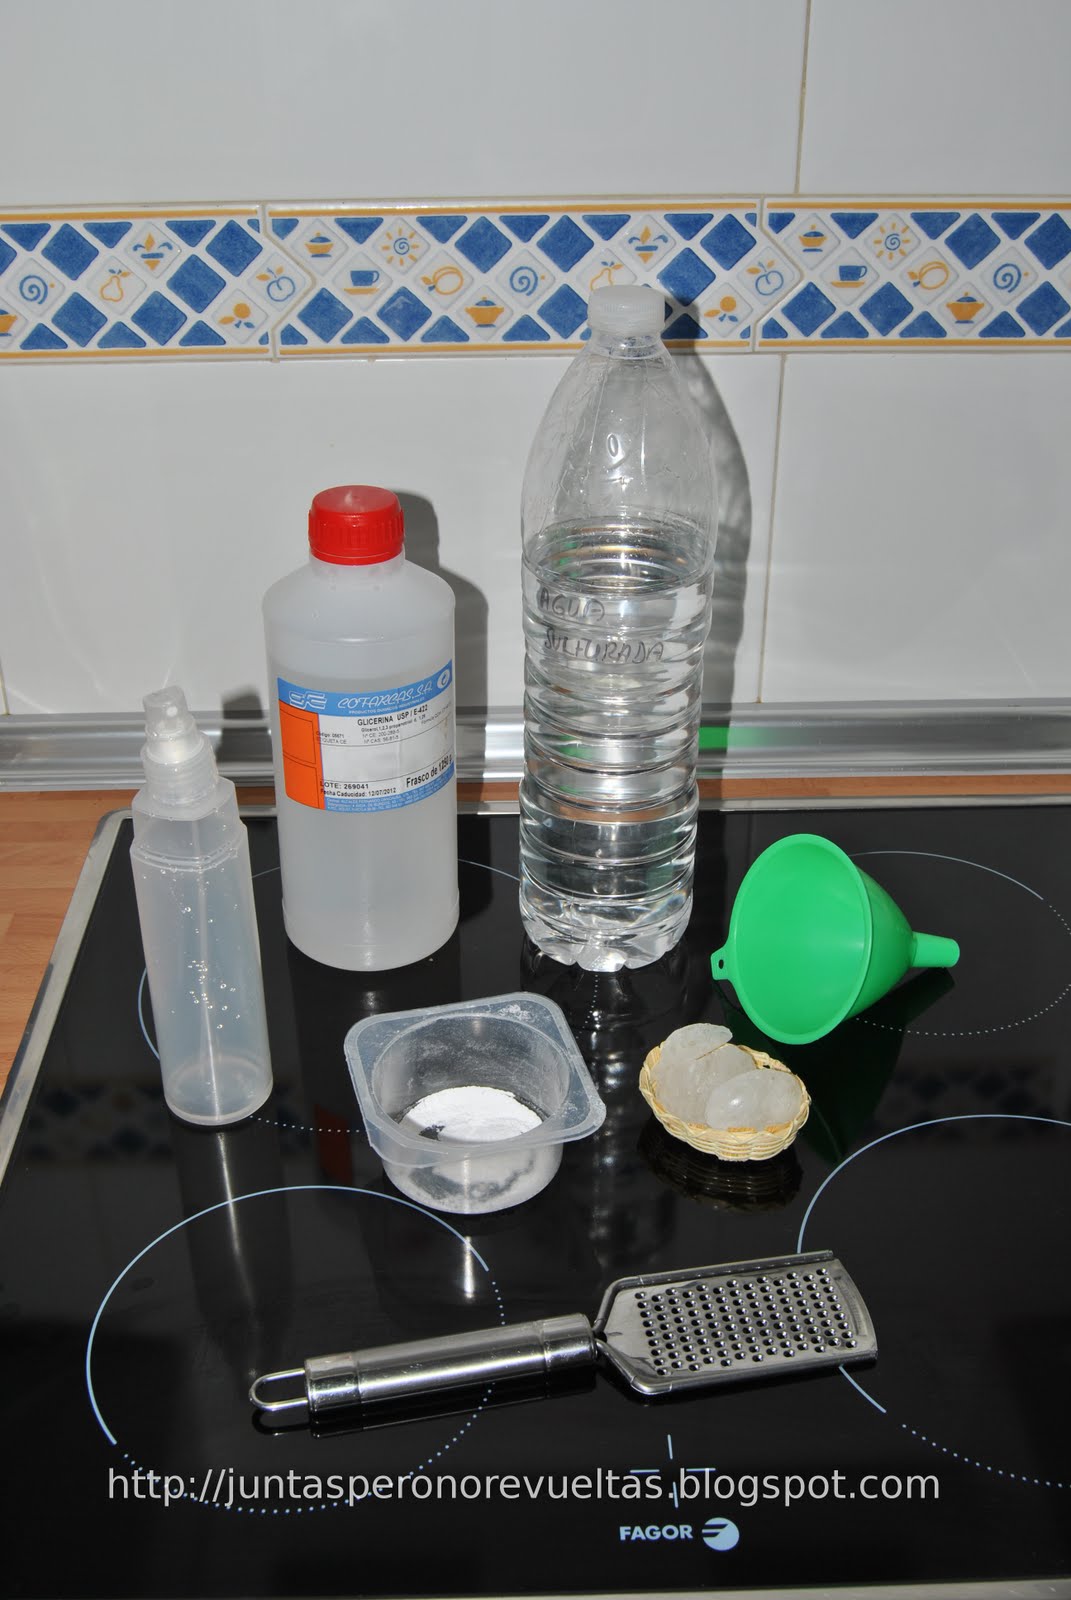
En primer lugar, depositamos el pigmento sobre el godet, y lo extendemos bien. Después, vamos añadiendo alcohol poco a poco, y removemos bien (para esto, me ayudé de un palillo). Vamos añadiendo más pigmento y alcohol, hasta que no se vean huecos en el godet, pero con cuidado de no llenarlo demasiado, porque si no, no se prensará bien (al menos, esto fue lo que me pasó a mí).

First of all, put the pigment on the pan, and spread well. Then, add a few drops of rubbing alcohol, and mix well (I used a toothpick for this). Add more pigment and rubbing alcohol, until you've covered the pan completely, but being careful of not filling too much, because then you wouldn't be able to press it (at least, that's what happened to me).


Cuando esté todo bien mezclado, y con una consistencia un poco pastosa, ha llegado el momento de prensar. Para ello utilizaremos algo del mismo tamaño y forma que el godet (yo usé una torre de tarritos, que venden en las tiendas multiprecio precisamente para echar cremas y llevárnoslas de viaje), y papel de cocina (con las servilletas de papel queda muchísimo mejor), que absorberá el exceso de alcohol.

When the mixture has a doughy consistency, it's time to press. We will use something the same size and shape as the pan to do so (I used a..., which are sold at multiprice stores just to hold our facial cream and so on when we travel), and kitchen paper (paper napkins are perfect for this), which will absorb the excess alcohol.


Cuando ya tengamos todos los pigmentos prensados, antes de utilizarlos, hay que dejarlos airear durante 24 horas, para que se evapore el alcohol. Mi estupenda terraza me vino de maravilla para esto.

When we have all the pigments pressed, we must let them air for 24 hours before using them, to allow the alcohol to evaporate. My wonderful terrace was perfect for this.

Y este es el resultado... hasta el momento.

And this is the result... so far.

Si os estáis preguntando por las marcas de los pigmentos que he compactado, son de Yes Love, NYC, Basic, Bourjois y Etos (que compramos en Amsterdam). Y después de prensados y aireados, los que han quedado con un acabado más tizoso a mi parecer han sido los de Etos. Todavía no me he hecho ningún look con ellos, así que ya os contaré.

If you're wondering about the brands of the pigments I've pressed, they are: Yes Love, NYC, Basic, Bourjois and Etos (which we bought in Amsterdam). And after having pressed them, Etos' pigments have now a more 'chalky' finish, in my opinion.
I haven't made a look with them yet, so I'll tell you when I do.

EDITO: Aunque haya pasado mucho tiempo desde que publiqué esta entrada, os contaré que de todos los pigmentos que compacté, los que quedaron mejor de todos con diferencia fueron los de Yes Love, Basic y Bourjois. Tanto los de NYC como los de Etos, en cuanto metes el pincel, se quedan hechos polvo (nunca mejor dicho). No sé cómo se comportarán los de otras marcas al compactarlos.

EDIT: Although it's been quite a long time since I uploaded this post, I'll tell you that the pigments that pressed the best are those from Yes Love, Basic and Bourjois. Both the NYC and Etos ones turn into powder when you pat the brush on them. I don't know about other brands.

jueves, 19 de enero de 2012

Hazlo tú: Paleta de labiales casera - DIY: Homemade lipstick palette.

Hola de nuevo:

Hoy os traigo un "Hazlo tú" de lo más sencillo. Seguro que tenéis alguna barra de labios que no usáis demasiado porque es demasiado oscura, clara, seca..., o simplemente porque no os gusta el color.
Cogiendo un poquito de aquí, otro de allá, se pueden crear colores únicos.
Sé que con esto no estoy haciendo un gran descubrimiento. Seguro que la mayoría de vosotras habéis fundido un par de trozos de labiales para crear uno de un color nuevo, o ese trozo de barra de labios que dabais ya por terminada y habéis conseguido sacar de su envase.

Hi again,

I'm here today with a super easy DIY. Surely you'll have a lipstick that you don't use much because it's too dark, light, drying..., or you just don't like its shade. But you can create unique colours by taking a little bit of here, a little bit of there...
I know that I'm not discovering anything new. I'm sure that most of you have melted some pieces of a lipstick to create a new one in a new colour, or maybe you melted that piece of lipstick you thought it was used up, after managing to take it out of its pack.

Personalmente, yo ya había hecho esto algunas veces. Pero lo "novedoso" de esto no es tanto lo que vamos a hacer, sino cómo lo vamos a presentar.

Personally, I've already done this some times. But the "innovative" thing is not what we're going to do, but the appearance we're giving it.

En esta entrada os hablábamos de unas paletas vacías que pedimos a Buyincoins. Las dos paletas pequeñas las teníamos reservadas para hacer sendas paletas de labiales: una para marox y otra para mí.

In this post we told you about the empty palettes we ordered from Buyincoins. We kept the two smallest ones to make two lipstick palettes: one for marox and the other one for me.

Sin más dilación, voy a detallaros lo que vais a necesitar:

*Una paleta vacía, con sus respectivos godets.
*Labiales (en barra, jumbos...).
*Una cucharilla de postre.
*Un cuchillo.
*Un palillo.
*Una vela (y mechero o cerillas para encenderla, como es lógico).
*Un recipiente que aguante el calor: en mi caso, usé un cenicero de cerámica.
*Cinta adhesiva de doble cara: esto es opcional, pero en nuestro caso, los godets se caían de la
paleta si le das la vuelta.


Without further ado, this is what you'll need:

*An empty palette, with its pans.
*Lipsticks (also lip jumbos).
*A coffee spoon.
*A knife.
*A toothpick.
*A candle (and a lighter or match to light it, obviously).
*A heat resistant recipient: I used an ashtray made of pottery.
*Double-sided adhesive tape: this is optional, but in our case, pans came out of the palette when turning it upside down.

En primer lugar, vamos pegando con cinta adhesiva los godets en sus respectivos huecos en la paleta. Cortamos los trozos de los labiales que vayamos a utilizar y los depositamos en la
cucharita. Si usamos jumbos, se puede cortar la punta con el cuchillo y sacar lo que hay dentro con un palillo.
Encendemos la vela y colocamos encima la cucharita con los trozos de labial. Poco a poco vemos cómo se va derritiendo (por cierto, que los de NYX se derriten en nada de tiempo). Removemos bien con el palillo para que quede homogéneo (muy importante si son colores distintos, para que
queden bien mezclados). Una vez esté bien hecha la mezcla, y todavía caliente (hay que hacerlo rápido, porque se enfría enseguida), verterla sobre el godet. Si no lo hacéis así, os puede pasar lo que os voy a enseñar en la tercera foto.


First of all, stick the pans to their places on the palette with the tape. Then cut the pieces of the lipsticks you want to use and put them on the coffee spoon. If you use a jumbo lip pencil, you can cut the end with a knife and take the content out with a toothpick.

Light the candle and put over it the spoon with the pieces of lipstick on it. Soon you'll see how they melt (btw, NYX's lipsticks melt at once). Mix well with the toothpick until it's smooth (this is very important if you're using different colours, to get them well mixed). Once this step is done, and with the mixture still hot, just pour on the pan (do this quickly, because the mixture gets cold very fast). If you don't do this as explained before, it could happen what I'm showing you on the third picture (just above this paragraph).


Y así es como han quedado nuestras paletas de labiales (hasta el momento).
Como podéis ver, la de marox ha quedado mucho mejor.

And now, here I'm showing you how our lipstick palettes look (so far).
As you can see, marox's looks better than mine.

miércoles, 9 de noviembre de 2011

Hazlo tú: Quitaesmalte hidratante - DIY: Moisturizing nail polish remover.

Hola de nuevo:

Hoy me gustaría compartir con vosotras una receta para hacer un quitaesmalte hidratante, que encontré (para no mentir, la encontró marox) en este blog.

Hi again,
Today I'd like to share with you a recipe to make a moisturizing nail polish remover, which I found (actually marox did, to be honest) on this blog.

Si queréis hacer esta receta, necesitaréis:
*Acetona pura.
*Glicerina.
*Agua.

If you want to practice this recipe, you'll need:
*Pure acetone.

*Glycerin.

*Water.


Se vierte la acetona pura en un recipiente, y después se añade un poco de glicerina: 1-2 cucharadas soperas de glicerina por cada 200 ml de acetona.
Como la glicerina es más densa que la acetona, se irá al fondo del recipiente, y aunque mezclemos bien, al rato tenderá a separarse.
Para evitarlo, añadiremos un poco de agua. ¿Por qué? Pues porque tanto la glicerina como la acetona son solubles en agua.
Se mezcla de nuevo y... ya tenemos nuestro quitaesmalte hidratante.

Pour the pure acetone on a container, and then add a bit of glycerin: 1-2 tablespoons of glycerin per each 200 ml of acetone. As glycerin is more dense than acetone, it will sink to the bottom of the bottle, and even mixing it well, it will tend to separate in a few minutes. To avoid it, just add a bit of water. Why? Because both glycerin and acetone are water-soluble. Mix again and... we have our moisturizing nail polish remover ready to go.

En mi caso, lo que he hecho ha sido adaptar un poco esta receta a lo que ya tenía en casa.
Prácticamente acababa de comprar un quitaesmalte sin acetona de Basic, así que no iba a comprar acetona pura para hacer esta receta.
Pues bien, lo que he hecho ha sido simplemente añadir un poco de glicerina al quitaesmalte, en la misma proporción de la receta que veis arriba. Como este quitaesmalte ya lleva agua en su composición, no he tenido que añadir más.

I have adapted this recipe to the things I had before. I had just bought an acetone-free polish remover from Basic, so I was not going to buy pure acetone to make this recipe. Well, what I did was just add a little bit of glycerin to my polish remover, in the same proportion as in the recipe mentioned above. As this remover already contains water as an ingredient, I did not have to add more.

¿Cuál ha sido el resultado en mis uñas? Pues la verdad es que las tengo más hidratadas que cuando utilizaba el quitaesmalte en su fórmula original, que me las dejaba algo resecas. Seguiré aplicando mi adaptación de esta receta, porque funciona. ¡Qué descubrimiento!

How did it work on my nails? Well, now they're really more moisturized than when I used my polish remover on its original, more drying formula. I'll stick to this adapted-recipe, because it works. What a discovery!

lunes, 15 de agosto de 2011

Hazlo tú: Sellador de maquillaje – DIY: Make-up sealer.


Hacía algún tiempo que no subía ninguna entrada de “brico-cosmética”. Hoy os traigo una receta para que podáis hacer vuestro propio sellador de maquillaje en casa. La idea no es original mía, sino que adopté la que dio Gijifacialsmakeup en uno de sus vídeos.

It's been quite a long time since I posted the last 'DIY-cosmetics' entry. Today I'm back with a recipe so you can make your own make-up sealer/setting spray. The idea is not originally mine, as I adopted one that Gijifacialsmakeup shared in one of her videos on YT.

Para hacer este sellador de maquillaje, necesitáis:

*Agua de rosas o agua destilada (2 cucharadas). Yo usé agua sulfurada del balneario “La dama verde”.

*Glicerina líquida: 1 cucharadita.

*Mineral de alumbre (en polvo): ½ cucharadita.

*Un frasco atomizador.

*Un embudo.

*Un rallador.

*Un recipiente (para que caiga el polvo de alumbre).


To make this make-up sealer, you will need:

*Rose water or distilled water (2 tablespoons). I used sulphurous water from the spa 'The Green Lady'.

*Liquid glycerin: 1 teaspoon.

*Alum stone (into powder): ½ teaspoon.

*A bottle with spray.

*A funnel.

*A grater.

*A bowl (for alum powder).


Por supuesto, si queréis hacer más cantidad, simplemente tendréis que aumentar la proporción de cada cosa.

Obviously, if you want to make a bigger amount of it, just increase the proportion of each ingredient.

Lo primero de todo es rallar el mineral de alumbre. Usé uno de los pequeños trozos en los que se rompió mi “piedra preciosa” que usaba como desodorante (lo compré en Bubbly). Hay que tener cuidado con los bordes, porque pueden cortar.


First of all, grate the piece of alum stone. I used one of the small pieces in which my 'precious stone' I used as deodorant broke into (I bought it at Bubbly). Be very careful with the edges, they're very sharp and you could cut yourself.


Después, con ayuda del embudo, vas introduciendo los ingredientes en el frasco atomizador.

After that, with the help of the funnel, put all the ingredients into the spray bottle.

Ahora sólo tienes que agitar para mezclarlo todo y... ¡listo para usar!

Now just shake well to mix it all and... ready to use!

lunes, 13 de junio de 2011

Hazlo tú : Cesta para jabones de malla plástica / DIY : Soap basket from gardening fence mesh.


Hoy os traemos otra idea de manualidades aplicadas. A mi madre hace tiempo alguien le regaló un juego de servilleteros hechos a partir de malla plástica. Este material se usa habitualmente en jardinería, y lo podéis encontrar en cualquier ferretería de barrio. Es probable que también lo encontréis en grandes superficies especializadas como AKI o Leroy Merlin.
En concreto la que utilizamos nosotras para este menester, es de color blanco y los cuadraditos son de 5mm -creo que también las fabrican de 10mm y en otros colores como verde oscuro. Mucha gente las usa para proteger los barrotes de los balcones y evitar posibles accidentes o caídas de niños y mascotas, aparte de para jardinería.
Os dejo una foto tomada de la web de un proveedor de este material, para que veáis otros datos como la composición y demás.

We're back with another DIY tip today. My mother was given a set of napkin holders a long time ago, made from gardening fence mesh. This material is available from any hardware store and probably from larger specialized stores like AKI and Leroy Merlin in Spain (Michael's/Walmart/Home Depot in the US, perhaps??). The one we use in this tutorial is white and the squares are 5mm in size -I've seen them in green and with 10mm squares-. Many people here use this to cover the bars in balconies to prevent the accidental fall of both children and pets and also to prevent children from stucking out their head through the bars as well as for gardening. I'm enclosing a link with a photo of the said material from a local supplier, so you can see what it looks like, what it's made of and so on.

Por casualidad, un día nos dio por utilizar el servilletero más pequeño como jabonera, al comprobar que las habituales jaboneras planas de plástico o piedra natural no lo conservaban en buen estado; es decir, seco a las pocas horas de usarlo. Creo que no hace falta que diga que el jabón húmedo es un criadero de gérmenes, por lo que lo ideal es conservarlo de manera que se pueda airear y secar lo antes posible. Si sabéis de lo que os hablo y estáis hartas de encontraros vuestro jabón corporal o champú sólido en la ducha todo “baboso” cada vez que lo vais a utilizar, seguid leyendo.
Otra ventaja de esta cestita que permite que nuestro jabón esté bien sequito es que éste os durará mucho más tiempo. Garantizado. Algo muy de agradecer teniendo en cuenta que, en el caso de los champús sólidos, salen bastante más caros en comparación con los líquidos de toda la vida.

By chance, one day we came up with the idea of using the smallest napkin holder in that set as a soap basket, once we realized the usual plastic or natural stone soap dish did not keep it properly, in the sense that it was still wet a few hours -or even the next day- after use. I don't think I need to state how unhygienic a wet bar of soap is, with bacteria growing all over the place. You need to store your soap in a container that allows it to air and get dry as soon as possible. If you know what I mean and are fed up of finding your solid shampoo or soap bar day after day all slimy and just disgusting to look at, let alone use in your shower, keep on reading.
Another advantage of this basket is that your soap/shampoo bar will last a lot longer. Guaranteed. Something you'll probably appreciate considering how pricey solid shampoos are, as opposed to your everyday liquid shampoo.

Como a nosotros se nos había terminado, fuimos a la ferretería y compramos un trozo de 20 cm de ancho, suficiente cantidad para hacer varias cestas. Calculo que pueden salir cuatro. Nos costó 0,64 €, si mal no recuerdo. También necesitaremos aguja e hilo para coser las distintas piezas, tanto para hacer un reborde exterior de cada pieza como para unirlas entre sí. Mi hermana compró una pequeña madeja de hilo de crochet en los chinos: es del nº12 y creo que costó 0,60 €. Si no tenéis, rebuscad en vuestro costurero antes de comprar, a lo mejor encontráis otro tipo de hilo que os pueda servir -posiblemente, el hilo que se usa para el punto de cruz os sirva; aunque teniendo en cuenta que de costura yo entiendo cero patatero, lo dejo también a vuestro criterio.

Since we had run out of mesh, we went to the nearest hardware store and bought a piece of 20cm/8 in. of width -lucky for you we bought my sister a ruler with both metric/imperial units, lol!. This will be enough to make several soap baskets, maybe four of them. We paid €0,64, if I'm not mistaken. You will also need needle and thread to both create a rim around each piece and later sew the different pieces together. My sister bought a small hank of crochet thread at a Chinese Euro store: it says nº12 -whatever that means- and cost €0,60. If you don't have any, search through your sewing basket before you buy it, as other type of thread might do the trick. I'm thinking the thread that's used for cross-stitching might do, but since my sewing skills are close to nil, I leave that to your better judgement.

Para cortar las distintas piezas, a mi hermana le facilitó mucho la tarea su flamante colchoneta de corte y cúter circular, cortesía de Ebay. A ver si os lo enseña con más detalle, porque son la caña. Con un par de tijeras de toda la vida, se puede cortar el material perfectamente, aunque evidentemente os llevará más rato. La malla que compramos venía un poco torcida, aunque no tiene porqué afectar al resultado final. O eso esperamos, sobre todo porque la que véis en las fotos es muy especial.

To cut the different parts, my sister used her beloved self-healing cutting mat and rotary cutter, which she got from Ebay. I hope she shows that to you in more detail some other time, because they totally rock. Of course you can do this with a good pair of scissors, but it will be more time consuming. Our mesh was a bit uneven -like lopsided or something- but it doesn't have to affect the end result. Or so we hope, especially because the one pictured is meant for something important.

Ahora Marian os va a explicar cómo la hizo.

Now Marian will explain to you how she made it.

Como marox os ha dicho ya, lo primero de todo es cortar las piezas, teniendo cuidado de cortar los bordes puntiagudos. Después de cortadas y “rematadas”, hay que bordear con el hilo cada una de las piezas. Podéis ver aquí cómo lo hice.

As marox has already told you, the first thing you have to do is to cut all the pieces, carefully cutting all the sharp edges. When you're done, you have to go around each piece with the thread. You can watch here how I did it.


Una vez hecho esto, hay que unir todas las piezas: se une la base a las piezas laterales, y después, éstas entre sí. Se hace de la misma forma que habéis visto antes, pero esta vez, cogiendo con la aguja y el hilo las dos piezas juntas, dándole ya la forma que tendrá después.
Por último, unimos el asa a dos piezas laterales opuestas; preferentemente, las más largas.
Sé que esta explicación se puede hacer un poco farragosa, así que es mejor que veáis unas fotos del proceso.


Once this step is done, it's time to 'sew' all the pieces together: join the piece of the base to the ones at the sides, and after that, all these ones between them. You have to do this the same way as you watched before, but this time take with the needle and thread the two pieces together, giving it the shape it'll have afterwards.
And to finish, you have to join the handle to two opposite side pieces, preferably the two longest ones.
I know all this explanation could be a little bit confusing, so it's better for you to see some photos of the process.

¿Os ha gustado? Si es así, os animo a que la hagáis. Os aseguro que es más fácil hacerla que explicarlo.


Did you like it? If so, I encourage you to make one. I assure you that making it is easier than explaining the making off.

Edito: Aquí tenéis la foto del servilletero que nos regalaron en su día y que inspiró estas jaboneras. Nuestras cestitas las colgamos con un lazo o cordón en la ducha -al accesorio donde pongáis las esponjas o donde podáis.

Edit: Here's a picture of the original napkin holder that inspired our soap baskets. Ours are hanging from a ribbon, strand or similar -attach yours by that to your sponge holder or anywhere you can in your shower cubicle.


martes, 24 de mayo de 2011

Hazlo tú / DIY 'Brush guards'

Hoy os traigo mi primera entrada de 'manualidades'. No se trata de una idea original mía, sino que simplemente decidí seguir el consejo que nos proponía Arroin80 en el video que dejo a continuación.
En mi caso, decidí pedir el producto por Internet, a un vendedor de Ebay UK. Os dejo los datos al final del post.


Here's my first DIY blogpost. I'm not the mastermind behind this idea, I'm merely borrowing this from the Spanish beauty guru Arroin80, who shared this with us in the following video. In my case, I ordered them online, from an Ebay UK seller. See details at the end of this post.

En el video, la idea se le ocurre a su marido, informático, ya que el uso original de este producto es como protector de cables en ordenadores personalizados o 'modding'. Como los precios y condiciones de los proveedores que ella conocía no me convencían, en seguida me plantée probar en Ebay. Pero claro, ¿cómo leches busco el producto en cuestión? ¿Qué nombre escribo en la cajita de búsqueda? Tras algunas pequeñas pesquisas, averigué que a las dichosas 'fundas expandibles' se las conoce normalmente en inglés como 'expandable braided sleeving'.

In the video, the idea comes originally from Arro's husband, an IT technician, since the intented use of the product is to protect computer cables in customized computers or 'modding'. The prices and terms of the suppliers she suggested were not too appealing, so I immediately knew Ebay or 'Evil Bay' would come to my rescue. But then, I had another problem: What was the English for the said 'fundas expandibles'? How on earth do I make my search? After a little bit of research on my part, I found out the most common term was 'expandable braided sleeving'.


Una vez que sabemos cómo se llaman, me decidí a pedirlas al Reino Unido, ya que las medidas y longitud de estas fundas venía expresada en mm y metros, vamos lo que viene siendo 'en cristiano'. Si me ponen que vienen X pulgadas y demás, me quedo igual que estoy.
En la guerra métrico-imperial, me da que gana el sistema métrico por goleada, jeje. Aunque sé que ésto en mí tiene delito, yo es que para los números soy negada total y me daba miedo o bien quedarme corta o pasarme pidiendo.

Now that the translation problem was solved, I decided to order them from the UK, mainly because the length and width of the sleeves came in mm and metres. In the metric-imperial war, I got a feeling metric would win hands down, lol. I know in my case it shouldn't be an excuse, but my maths skills have always sucked and I was afraid of either ordering too little or too much -too small or too big also. Sorry, but reading X inches and Y feet sounds like Chinese to me.

El siguiente paso, fue medir nuestras brochas, para saber qué medidas (anchos) necesitábamos. Como todo el mundo, supongo, tenemos brochas de ojos y de rostro. Finalmente, nos decidimos por estas tres medidas: 6mm, 8mm y 15mm. De las dos últimas, nos ha sobrado bastante pero de la funda de 6mm la gastamos entera. Tuvimos justo para tanto mis brochas como para las de mi hermana. Las nuestras son negras, que eran las más baratitas y total para lo que son, nos daba igual. Si visitáis la tienda del vendedor, veréis que la mayoría están disponibles en varios colores.

The next step was measuring our brushes to get an idea of which measures (width) we would need. Like everyone else, I suppose, we have eye and face brushes. We ended up ordering these three widths: 6mm, 8mm and 15mm. We spent all the length from the 6mm one, but have plenty of the other two left. We used them to make brush guards for both my brushes and my sister's. We ordered them in black, the cheapest ones, but if you browse through the seller's shop you'll see they're available in a variety of colours.

Como explica Arroin80 en el video, lo único que tenéis que hacer es quemar los extremos para que no se deshilachen (o 'espipen' como decimos en mi tierra). Luego cortáis el trozo necesario para proteger la virola y las cerdas de vuestras brochas, quemando de nuevo -con un mechero o una vela, por ejemplo- los dos extremos de nuestros protectores caseros de brochas.


All you have to do, as explained by Arroin80 in the video is burn both edges of the sleeving to prevent them from fraying. Then cut them to size to cover both the ferrule and the bristles, burning both sides of our homemade brushguards again. You can use a candle or a lighter for this, which is what we used.

Vendedor / Seller: heatshrink-online

Precios (según mi historial de Ebay, para que os hagáis una idea /Prices: according to my Ebay history, for you to get an idea):
6mm = 0,99 libras/GBP 0.99 - 8mm = 1,09 libras/GBP 1.09 - 15 mm = 1,39 libras/GBP 1.39.
Los gastos de envío fueron muy baratitos, poco más de una libra. Vinieron en un sobre de airbag y tardaron poco en llegar.
Shipping was cheap -a little over a pound- and fast and they came well protected in a padded envelope.

** Edito ** Update ***

También se pueden encontrar en Buyincoins *aquí*, tienda online con gastos de envío gratis y que admite Paypal.
You can also find these at Buyincoins *
here*, an online store with free shipping and Paypal secure payment.

lunes, 2 de mayo de 2011

HAZLO TÚ: DESMAQUILLANTE DE OJOS / DIY: EYE MAKE-UP REMOVER.

Se nos acaba de terminar el desmaquillante de ojos, y he pensado que si puedo hacerlo yo, ¿para qué lo voy a comprar?

La idea surgió de un vídeo en youtube de TheMissLios. Lamentablemente, cerró el canal. Ahora ha abierto uno nuevo. Os dejo el enlace aquí.

No la he copiado al 100%, sino que basándome en su propuesta, he hecho mi propia receta.

We've just run out of eye make-up remover, so I've thought that if I can do it myself, why am I going to buy it?

The idea came from a video on youtube from TheMissLios. Unfortunately, she closed the channel. Now she has opened a new one. Here's the Iink.

My recipe is based on her proposal, but it's not a perfect copy.

Bueno, vamos al asunto, que si no, me enrollo.

Los ingredientes principales de este desmaquillante de ojos, bifásico, para más señas son: agua y aceite.

Well, let's get to the point.

The main ingredients of this two-phase eye make-up remover are: water and oil.

En el vídeo que vi, utilizaba agua de hamamelis, pero se me ocurre que podéis utilizar agua termal. Yo he utilizado agua de manantial, sulfurada, con propiedades que la hacen muy buena para la piel. ¿Dónde la conseguí? Pues cuando estuvimos en el Balneario “La Dama Verde”, de Almeida de Sayago (Zamora).

Para que el desmaquillante sea bifásico, además de agua, tiene que llevar aceite. Yo he utilizado aceite de almendras (en mi caso, el de Deliplús), y un chorrito de aceite de oliva. Por supuesto, no hace falta que uséis varios tipos de aceites.

Además del agua y el aceite, he añadido un poquito de glicerina líquida (1-2 ml), para añadirle al “invento” propiedades hidratantes.

La glicerina líquida podéis conseguirla en las farmacias... que estén dispuestas a vendérosla. Yo la conseguí en una droguería “de las de toda la vida”. Un litro de glicerina líquida al módico precio de 4,75€.


In the video I watched, the girl used hamamelis water, but I think you could also use thermal water.

I have used sulphurous spring water, with properties which make it very good for your skin.

Where did I get it? I got it at the spa 'La Dama Verde' ('The Green Lady'), in Almeida de Sayago (Zamora, Spain).

To get a two-phase eye make-up remover, besides of water, it must have oil. I have used almond oil (the one from 'Deliplus', in my case), and a trickle of olive oil. There's no need to use several types of oil.

Besides water and oil, I added a little bit of liquid glycerin (1-2 ml), to add moisturising properties to this 'invention'.

You can get liquid glycerin at the Chemist's... if they want to sell it to you, of course. I got mine at a local drugstore, the sort that have been there for ages. For a litre of liquid glycerin I paid the bargain price of €4,75.

Está receta está dermatológicamente testada... en mi hermana y en mí misma.

La primera vez que la hicimos fue días antes de nuestro viaje a Berlín (que ha generado tantas entradas en este blog). Hicimos un formato de viaje, para que ocupara lo menos posible.

Porque en Berlín vimos muchas cosas y estuvimos todo el día de un lado para otro, pero eso sí, bien maquilladitas. Y claro, luego había que desmaquillarse.


This recipe is dermatologically tested on... both my sister and me.

The first time we made it was a few days before our trip to Berlin (this trip has brought so many posts to this blog). We made it travel-sized, to take up the least space possible.

We saw so many things in Berlin, and we spent all day from one place to another, but well made-up. And of course, at the end of the day we had to remove it.

sábado, 16 de abril de 2011

Propuesta de reciclaje - Recycling proposal


Hola, chicas:
Hoy os traigo una propuesta de reciclaje. No hace falta que os diga que atravesamos tiempos difíciles; eso ya lo sabéis. Seguro que habréis oído decir a vuestras madres eso de: "No se tira nada".
Pues eso; vais a ver cómo podéis reciclar vuestros viejos vaqueros y convertirlos en... ¡un bolso!
Sí, habéis leído bien: un bolso. Si os parece buena idea, seguid leyendo.

Hi, girls,
Today I have a recycling proposal for you. There's no need to say that we're going through hard times; you already know that. I'm sure that you have heard your mother saying: "Don't throw anything away!".
OK; now you're going to see how to revamp your old jeans and turn them into... a bag! Yes, a bag. If you think this is a good idea, keep on reading.

La idea no fue original mía (ojalá), sino de un vídeo que vi en youtube de gijifacialsmakeup.
Por cierto, ahora que pienso, la idea de hacer la manta de brochas también fue por un vídeo de Gina, entre otros.

The idea wasn't originally mine (I wish), it was from a gijifacialsmakeup video on youtube. By the way, I remember that the idea of making my own brushroll also came from Gina's videos, among other videos.

Bueno, al grano. Me entusiasmó la idea de hacer un bolso con unos vaqueros que estaban tan desgastados que se empezaban a romper, así que me puse manos a la obra, saqué fotos del proceso y subí un vídeo a youtube, que podéis ver aquí, si queréis.

Well, let's get to the point. I was very enthusiastic about making a bag from a pair of worn-out jeans to the point that they were ripping; so... shoulders to the wheel!, I took photos of all the process and I uploaded a video on youtube, that you can watch here, if you want to.

De todas formas, os detallo las explicaciones a continuación.

Anyway, I'll explain in more detail below.

Necesitamos:
Unos vaqueros viejos (o que ya no usemos).
Tela para el forro (mejor que no sea elástica).
Cremallera.
Y por supuesto: aguja, hilo, máquina de coser, cuchilla abreojales (para deshacer las costuras).

We need:
An old pair of jeans (that we're not using anymore).
Lining Fabric (avoid elastic fabric if you can).
A zipper.
And, obviously: needle, thread, sewing machine, seam ripper.

Primero cortamos el largo del pantalón a la medida de como queramos el bolso.
Deshacemos la costura de la parte interior de la pernera. También deshacemos la costura de una parte del tiro, tanto por delante como por detrás, para que la tela quede sin dobleces.
Ahora cosemos siguiendo la línea de la antigua costura.
Ahora, marcamos hasta donde queramos de profundo nuestro bolso. Sobrehilamos y cosemos.
Ahora, de las patas del pantalón, cortamos 2 tiras, para hacer las asas. Doblamos a lo largo cada una de las tiras, y hacemos 2 costuras: largo y ancho.
Dejamos uno de los extremos sin coser, para poder darle la vuelta.
Para que el bolso tenga un mejor acabado, podemos hacer una costura, bordeando lo que será la base. Y ahora, unimos las asas al bolso.


First of all, cut the jeans the same size you want the bag to be. Then, unpick the seam of the inner part of the leg. Unpick the seam of one part of the top block too, both at the front and at the back, so the fabric won't have any folds. Now sew following the line left by the old seam. Then mark the depth of the bag. Now whipstitch and sew. Now cut 2 strips from the legs of the jeans, to make the handles. Bend each strip lengthwise, and make two seams: length and width. Leave one of the ends unsewn, to turn the handle the right way out. To get a better finish for the bag, you can make a stitch, all around the bottom of the bag. Then, join the handles together with the bag.


Ahora, vamos con el forro.
Cortamos 2 trozos de tela a medida del interior del bolso (teniendo en cuenta también la base).
Cortamos un rectángulo para hacer un bolsillo interior. Unimos el bolsillo.
Cosemos el dobladillo de la parte de arriba del forro, donde irá la cremallera. Cosemos un lado de la cremallera y después el otro. Ahora, unimos las dos partes del forro.
Metemos el forro dentro del bolso y lo ajustamos bien.
Ya sólo nos falta coser a mano la parte del forro donde va la cremallera al borde de arriba del bolso.
Y por fin, nuestro bolso terminado.

Now, let's do the lining. Cut 2 pieces of fabric the same size of the inner part of the bag (don't forget to cover the bottom as well). Cut a rectangle to make a small pocket. Join the pocket together with the fabric. Sew the hem of the upper part of the lining, where the zipper will be located. Sew one side of the zipper; then, do the same with the other side. Now join the two parts of the lining together. Put the lining into the bag, and fix it well. Now, just sew (by hand) the part of the lining where the zipper is with the upper part of the bag. And, at last, our bag is finished.


Bueno, ¿qué os ha parecido? Espero que os animéis a hacerlo.

Well, what do you think about it? I hope you feel like doing it yourself.

sábado, 9 de abril de 2011

Caja para guardar esmaltes (Házlo tú) - Nail polish storage DIY

Hoy os traemos una actividad para que con vuestras manitas recicléis una pequeña caja para, por ejemplo, guardar vuestros esmaltes de uñas. Ése ha sido al menos el uso que yo le he dado.

Materiales:

Una cajita de cartón *Ya os desvelaré en otra entrada de qué era*
Recortes de papel de regalo
Celo
Tijeras

Opcional: Regla y lapicero

Como véis, no hace falta que compréis nada. Incluso, si no tenéis papel de regalo, lo podéis sustituir por papel de revista.


We're back today with some DIY, recycling a small cardboard box you can use to keep your nailpolishes, for instance. At least, that's what I'm using mine for.

You'll need:

A small cardboard box *I'll reveal in a different entry where I got mine from*

Some wrapping paper clippings

Scotch tape

Scissors

Optional: Ruler and pencil

There's no need to buy anything. If you don't have any wrapping paper you could use some glossy paper from old magazines.


Necesitaréis la cantidad suficiente para cubrir toda la caja, tanto por dentro como por fuera. Yo decidí no quitar las solapas de la caja, para que quedara con algo más de cuerpo.

You're going to need enough paper to cover the entire box, both inside and out. I decided not to remove the side flaps in my box so as to give it a little bit of 'body' and make it sturdier.

Tan sólo os llevará unos diez minutos transformar alguna cajita que tengáis en casa y de paso usar esos pequeños trozos de papel de regalo que no son lo suficientemente grandes para envolver nada pero que da pena tirar. Además, la vida está muy cara y seguro que disfrutaréis más haciendo algo con vuestras manitas que no comprándolo directamente.


Transforming some box you already have lying there at home will only take about ten minutes of your time and it's a good way of finally finding some use for all those little gift wrap scraps that are too small to use on their own but don't have the heart to throw away. Besides, everything's expensive today and I'm sure you'll enjoy creating something with your own hands rather than just buy it.

¿Habéis hecho algo de manualidades para guardar vuestro maquillaje? Si es así, nos encantaría verlo.
Have you done any DIY to store your make-up? We'd love to check it out if you have.

jueves, 24 de marzo de 2011

Cómo se hizo: mi manta de brochas / Making off: my brushroll

En mi anterior entrada os presentaba las nuevas brochas de la familia potinguera, en su nuevo hogar; es decir, la manta de brochas que me hice hace algún tiempo.
Pues bien, hoy os voy a enseñar cómo podéis hacer vuestra propia manta de brochas. Desde luego, os va a costar menos dinero que las que venden ya hechas (no voy a mencionar marcas).

In my last post I introduced you the new brushes of the makeup-family, at their new home: the brushroll I made myself some time ago. OK, today I'm going to show you how to make your own brushroll. Of course, much cheaper than other ones you can buy (I'm not going to mention any brand).

Cuando la terminé, o mejor dicho, las terminé (porque hice dos: una para mí y la otra para mi hermana), hice un vídeo explicando cómo la hice, que podéis ver aquí.
De todos modos, os detallo las instrucciones a continuación.

When I finished it (or them, because I made two: one for myself and the other one for my sister), I recorded a video explaining how I made it, which you can watch here.


For our English-speaking readers: Unfortunately, this video is only available in Spanish, but don't worry: I'm going to translate the explanations.

Necesitamos:
*Tela (yo usé tela de tapicería).
*Bies de algodón para bordear.
*Cinta de raso para el lazo.
*Y, obviamente, aguja, hilo y máquina de coser.

Cortamos 2 rectángulos de 55x25cm.
Cortamos uno de ellos a lo largo en 2 partes (no tienen por qué ser iguales).
Una de ellas será el hueco para las brochas. La otra será la solapa para que queden protegidas.
Cosemos el dobladillo de la parte de abajo.
Sobre el rectángulo que no hemos cortado presentamos la parte donde irán metidas las brochas. Fijamos con alfileres, hilvanamos y cosemos.
Presentamos la parte de arriba, la solapa. Fijamos, hilvanamos y cosemos.
Marcamos los huecos donde van a ir las brochas, hilvanamos y cosemos.
Ahora, ponemos el bies de algodón alrededor del borde inferior de la solapa, y de todo el contorno de la manta, salvo la parte de arriba, que haremos al final.
Colocamos el bies de la parte de arriba y cosemos.
Colocamos el lazo.
Y ya está la manta terminada.


We need:
*Cloth (I used fabric).

*Cotton ribbon (bias tape).

*Satin ribbon.
*And, obviously, needles, thread and a sewing machine.


Cut 2 rectangles of fabric, 55x25cm each.
Cut one of them lengthwise into 2 parts (they don't have to be the same size). One of them will later hold your brushes. The other one will be the flap to protect them.
Sew the hem of the lower part.

Now put the part that will hold the brushes on the rectangle we didn't cut before. Fix with pins, tack and sew.
Now do the same with the flap. Fix, baste and sew.

Mark the spaces for the brushes, tack and sew.

Now, put the bias tape around the lower part of the flap, and all around the brushroll, except the upper part, which we will put at the end.
Put the bias tape on the upper part and sew.

Sew the satin ribbon.
And now, your brushroll is finished.


Related Posts Plugin for WordPress, Blogger...