Hola de nuevo:
Cuando os presentamos *esta* entrada, os comentamos que teníamos entre manos un proyecto un tanto laborioso de restauración/decoración, que iba a requerir un poco de ayuda profesional.
Cuando os presentamos *esta* entrada, os comentamos que teníamos entre manos un proyecto un tanto laborioso de restauración/decoración, que iba a requerir un poco de ayuda profesional.
Hi again,
When we uploaded *this* post, we told you that we were working on a decor/DIY project, a more complex one that would require some professional input.
Well, we've recently finished that project and are now ready to proudly share it with you.
When we went to Portugal in the summer to order the new furniture for my living-room, I was drooling over a gorgeous piece I saw through a shop window The reason? They had a gorgeous armchair on display, very similar to *this one*. They asked me €550 for it, but considering it was upholstered with fabric imitating patchwork, I thought it was too pricey for me.
At this store you can find them upholstered in real patchwork, but they're much more expensive, as you will see if you click on the link.
But it was too late. I was already head over heels in love with that armchair, so I had to own a more affordable alternative.
As my mother and Marox are really good at finding bargains, they went to a second-hand furniture store (the same place where they found the headboards we already showed you), and came back with this armchair they got for €110 after some bargaining.
I know you're very eager to see the end result, so let's move on to the step-by-step.
First of all, remove the old fabric from the armchair.
After that, sand the entire surface with an electric sander, except for the arms and curved areas, where we'll use a sanding sponge for a neater job.
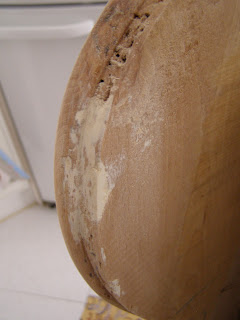
Then we need to repair all damaged areas with some woodfiller, and let it dry for 24 hours. Next we have to sand those parts again to remove any excess filler.
We continue by applying one coat of worm-fighting primer to protect the wood, and let it dry for 24 or 48 hours.
Now take a paintbrush for wood, and apply one coat of satin plastic paint (it'll be beautiful). Let it dry for one or two days.
If you want the grain to be seen, you can sand wherever you want with a sanding sponge. If not, then apply the second coat of paint and let dry for one or two days.
Now apply a coat of satin varnish, to protect the paint.
Tip: Whenever possible, try to use water-based products, this way the smell will be softer and your brushes will be easier to clean too.
This part of the project was done by both my parents and sister. I was going to be in charge of the next stage myself: sewing.
I had never done patchwork in my entire life, but I consider myself self-taught at this sort of thing. The Internet is an excellent tool for this, so I watched many videos on YT and read some blogs about it to get the basics right. As ready as I could ever be, I got on with it.
My mother and I went to some stores and street markets to 'hunt down' some fabric for the upholstery.

Instead of making a gigantic fabric made of cloth pieces sewn together, I thought it would be wiser to make smaller pieces, using the different pieces we took out before as a pattern. Having more manageable pieces sounded easier.
I made them a bit larger than needed, so as not to make the upholsterer's job any more difficult.
I cut my pieces of fabric in different sizes (big, small, wide, narrow) and shapes: rectangular, square (or almost).
To prevent them from fraying, I serged them with my beloved overlock machine from Lidl. Marox also helped me with this step, finishing the loop-stitches by hand.
I then arranged the pieces to my liking, and I sewed them together with my sewing machine.
Once all the pieces are finished, it's time for part three of this project, carried out by the upholsterer.
He told me that he had never upholstered anything with patchworked fabric, so he was curious to try. He said it very interesting for him, but also very laborious. Fortunately he didn't charge us more and kept the price he'd originally given us in his estimate, €100.
We paid about €30 for the paint. Considering the estimated total price of the fabric was about €50, the average price of the whole project has been about €290. A few of the scraps were quite big, so we'll see if I can do something else with them too.
After such a hard work, here is the finished product. What do you think? Do you like it?

When we uploaded *this* post, we told you that we were working on a decor/DIY project, a more complex one that would require some professional input.
Well, we've recently finished that project and are now ready to proudly share it with you.
When we went to Portugal in the summer to order the new furniture for my living-room, I was drooling over a gorgeous piece I saw through a shop window The reason? They had a gorgeous armchair on display, very similar to *this one*. They asked me €550 for it, but considering it was upholstered with fabric imitating patchwork, I thought it was too pricey for me.
At this store you can find them upholstered in real patchwork, but they're much more expensive, as you will see if you click on the link.
But it was too late. I was already head over heels in love with that armchair, so I had to own a more affordable alternative.
As my mother and Marox are really good at finding bargains, they went to a second-hand furniture store (the same place where they found the headboards we already showed you), and came back with this armchair they got for €110 after some bargaining.
I know you're very eager to see the end result, so let's move on to the step-by-step.
First of all, remove the old fabric from the armchair.
After that, sand the entire surface with an electric sander, except for the arms and curved areas, where we'll use a sanding sponge for a neater job.
Then we need to repair all damaged areas with some woodfiller, and let it dry for 24 hours. Next we have to sand those parts again to remove any excess filler.

We continue by applying one coat of worm-fighting primer to protect the wood, and let it dry for 24 or 48 hours.
Now take a paintbrush for wood, and apply one coat of satin plastic paint (it'll be beautiful). Let it dry for one or two days.
If you want the grain to be seen, you can sand wherever you want with a sanding sponge. If not, then apply the second coat of paint and let dry for one or two days.
Now apply a coat of satin varnish, to protect the paint.
Tip: Whenever possible, try to use water-based products, this way the smell will be softer and your brushes will be easier to clean too.
This part of the project was done by both my parents and sister. I was going to be in charge of the next stage myself: sewing.
I had never done patchwork in my entire life, but I consider myself self-taught at this sort of thing. The Internet is an excellent tool for this, so I watched many videos on YT and read some blogs about it to get the basics right. As ready as I could ever be, I got on with it.
My mother and I went to some stores and street markets to 'hunt down' some fabric for the upholstery.

Instead of making a gigantic fabric made of cloth pieces sewn together, I thought it would be wiser to make smaller pieces, using the different pieces we took out before as a pattern. Having more manageable pieces sounded easier.
I made them a bit larger than needed, so as not to make the upholsterer's job any more difficult.
I cut my pieces of fabric in different sizes (big, small, wide, narrow) and shapes: rectangular, square (or almost).
To prevent them from fraying, I serged them with my beloved overlock machine from Lidl. Marox also helped me with this step, finishing the loop-stitches by hand.
I then arranged the pieces to my liking, and I sewed them together with my sewing machine.
Once all the pieces are finished, it's time for part three of this project, carried out by the upholsterer.
He told me that he had never upholstered anything with patchworked fabric, so he was curious to try. He said it very interesting for him, but also very laborious. Fortunately he didn't charge us more and kept the price he'd originally given us in his estimate, €100.
We paid about €30 for the paint. Considering the estimated total price of the fabric was about €50, the average price of the whole project has been about €290. A few of the scraps were quite big, so we'll see if I can do something else with them too.
After such a hard work, here is the finished product. What do you think? Do you like it?

Pues bien, el proyecto ya está terminado, y quería compartirlo con vosotras.
Cuando fuimos a Portugal en verano para encargar los muebles nuevos para mi salón, me quedé embobada ante el escaparate de una tienda. ¿La razón? Había visto una butaca muy parecida a *ésta*. Me pedían 550 euros por ella, y para estar tapizada con una tela que imita patchwork, me parecía demasiado.
En esta otra tienda los tienen de patchwork de verdad, pero cuestan mucho más caros, como podréis ver si pincháis en el enlace.
Pero ya era demasiado tarde. Me había enamorado de esa butaca, así que tenía que hacerme con una por menos dinero.
Como mi madre y Marox son especialistas en encontrar gangas, se fueron a una tienda de muebles de segunda mano (el Rastro Reto, donde encontraron los cabeceros que ya os enseñamos en su día), y vinieron con esta butaca, que compraron por 110€ tras un poco de regateo.

Como sé que estáis deseando ver el resultado final, vamos a empezar con el paso a paso.

Lo primero de todo es quitarle la tela vieja a la butaca.
Después, se pasa la lijadora a toda la madera; los brazos y torneados, con una esponja de lija.


Por lo que me comentó, nunca había tapizado con patchwork, lo que le resultó muy interesante, pero también muy laborioso. Afortunadamente, nos mantuvo el precio que nos dio como presupuesto, 100€.
Las pinturas nos costaron unos 30€. Teniendo en cuenta que el coste aproximado de las telas ha sido de unos 50€, el coste (también aproximado) del proyecto ha sido de unos 290€. De algunas telas, los retales eran enormes además, así que lo mismo hago alguna otra cosilla con ellos.
Cuando fuimos a Portugal en verano para encargar los muebles nuevos para mi salón, me quedé embobada ante el escaparate de una tienda. ¿La razón? Había visto una butaca muy parecida a *ésta*. Me pedían 550 euros por ella, y para estar tapizada con una tela que imita patchwork, me parecía demasiado.
En esta otra tienda los tienen de patchwork de verdad, pero cuestan mucho más caros, como podréis ver si pincháis en el enlace.
Pero ya era demasiado tarde. Me había enamorado de esa butaca, así que tenía que hacerme con una por menos dinero.
Como mi madre y Marox son especialistas en encontrar gangas, se fueron a una tienda de muebles de segunda mano (el Rastro Reto, donde encontraron los cabeceros que ya os enseñamos en su día), y vinieron con esta butaca, que compraron por 110€ tras un poco de regateo.

Como sé que estáis deseando ver el resultado final, vamos a empezar con el paso a paso.

Lo primero de todo es quitarle la tela vieja a la butaca.
Después, se pasa la lijadora a toda la madera; los brazos y torneados, con una esponja de lija.
Se reparan las imperfecciones, grietas y rozaduras con masilla para rellenar madera,
se deja secar durante 24 horas, se vuelven a lijar con el taco de lija esas zonas para quitar el exceso de producto.
Damos una mano de imprimación con tratamiento anticarcoma y protección de la madera. Dejar secar durante 24 ó 48 horas.
Con una paletina, dar una mano de pintura plástica satinada (queda precioso). Dejar secar un día o dos.
Si queréis que se vea la veta, podéis lijar en las zonas que queráis. Si no, podéis dar la segunda mano de pintura y dejar secar uno o dos días.
Dar una mano de barniz satinado,
para proteger la pintura.

Consejo: Intentad que estos productos sean al agua, el olor será mucho más suave y también limpiaréis las brochas con más facilidad.
Hasta aquí la primera parte del proyecto, que ha corrido a cargo de mis padres y mi hermana. Ahora viene la segunda parte, de la que me he encargado yo: la costura.
Yo no había hecho patchwork nunca en mi vida, pero me considero una autodidacta en estos temas. Como Internet es muy bueno para estas cosas, me ví unos cuantos vídeos en youtube y leí unos cuantos blogs, y cuando me sentí preparada, me puse a ello.
Mi madre y yo nos recorrimos varias tiendas y mercadillos en busca de las telas para hacer la tapicería.
En lugar de hacer una pieza de patchwork gigante, me pareció más adecuado hacer varias más pequeñas, de acuerdo al tamaño de los trozos de la tela vieja que quitamos. Será mucho más fácil de manejar.
Dejé un poco más de margen, para ponérselo un poco más fácil al tapicero.
Corté las distintas piezas de tela, unas más grandes, otras más pequeñas, unas rectangulares, otras cuadradas (o casi), anchas, estrechas...
Para que no se deshilacharan, las remallé con mi adorada overlock de Lidl. Marox también me ayudó en esto, rematando las cadenetas a mano.
Luego las dispuse como me pareció, y las uní con la máquina de coser.
Una vez que todas las piezas están terminadas, viene la tercera parte del proyecto, a cargo del tapicero.

Por lo que me comentó, nunca había tapizado con patchwork, lo que le resultó muy interesante, pero también muy laborioso. Afortunadamente, nos mantuvo el precio que nos dio como presupuesto, 100€.
Las pinturas nos costaron unos 30€. Teniendo en cuenta que el coste aproximado de las telas ha sido de unos 50€, el coste (también aproximado) del proyecto ha sido de unos 290€. De algunas telas, los retales eran enormes además, así que lo mismo hago alguna otra cosilla con ellos.
Después de tan duro trabajo, aquí está el resultado. ¿Qué os parece? ¿Os gusta?

Es preciosa y super-original, sois una familia de artistas!!!
ResponderEliminarSaludos y feliz finde!
ha quedado preciosa!!!!!!!!!!!!! de verdad, me encanta, os admiro, es muy buen trabajo por parte de todos, cada uno con su tarea pero un resultado buenísimo :D
ResponderEliminarvaya cambio!!! ha quedado genial madre mia jajaj vaya diferencia de como empezo a como termino!!
ResponderEliminarhttp://thecrazydreamland.blogspot.com.es/
Que butaca tan chula, es muy alegre!! Vaya artista, lo que te has ahorrado y encima la has hecho a tu gusto.
ResponderEliminarMadre mía pues queda precioso! besos
ResponderEliminarEstáis hechos unos artistas.
ResponderEliminarMe alegra un montón que os haya gustado, chicas. Muchas gracias por vuestros comentarios.
ResponderEliminarWhat a nice project :>
ResponderEliminarI really like the choice of doing something new with several pieces of fabrics, instead using only one!
Te ha quedado precioso, muy original. Yo tengo unos sillones espectaculares para tapizar, pero los presupuestos que me han dado son exhorbitados... 500 por cada uno... estoy buscando algún tapicero por BCN que los tapice mejor de precio.
ResponderEliminar@MyCuteBride Wed: Nos alegra que te haya gustado. 500€ por tapizar cada uno de los sillones me parece un atraco a mano armada. Lo más que nos ha llegado a cobrar este señor creo que han sido 150€. Me temo que Zamora te queda un poco lejos para traerlos. Este señor tapiza cosas de todo tipo, también asientos de coche y cosas así. Acaban de ir mis padres a recoger otro encarguito y encima les ha regalado varios muestrarios de telas (mi madre ya anda pensando qué puede crear con ellos).
EliminarIncreíble, ha quedado preciosa, me encantan los muebles tapizado en patchwork!
ResponderEliminarQuedan muy originales. Hasta que ví aquella butaca en Portugal (y encima la tela imitaba patchwork, que no era patchwork de verdad), no había visto nunca nada igual. Además la haces a tu gusto, combinas las telas como quieres..., y desde luego, no habrá otra igual.
EliminarMira a ver, con lo mañosa que tú eres, seguro que se te dan bien estas cosas.